

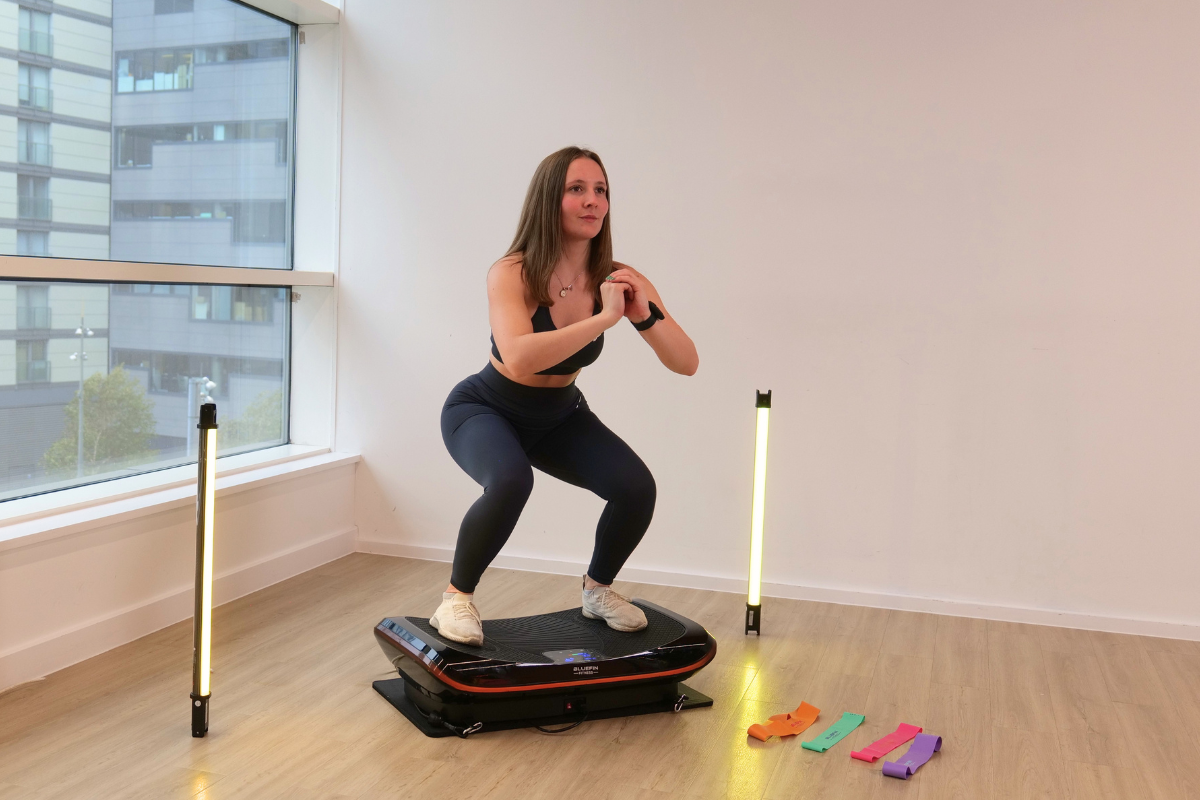
This step-by-step guide explains how to use a vibration plate for weight loss effectively, covering the science behind whole-body vibration, how to choose the right model, and how to build a progressive weekly routine that delivers real, lasting results as part of a healthy lifestyle.
Vibration plates have become one of the most talked-about pieces of home fitness kit in recent years, and it's easy to see why. They're compact enough to slide under a bed, accessible for virtually every fitness level, and a single session can be done in the time it takes to watch a TV episode. But here's the question that lands in every inbox: can a vibration plate actually help me lose weight?
The honest answer is yes, with the right approach. Vibration plates are a genuinely powerful addition to a weight loss routine. What they're not is a magic fix. Stand on one for ten minutes while scrolling your phone and expect nothing to change. Use one intelligently, consistently, and as part of a wider healthy lifestyle, and you'll start to notice real differences in how your body looks, feels, and moves.
That's exactly what this guide is designed to help you do. By the time you reach the end, you'll have a practical, structured plan you can start today. You'll understand the science behind how vibration plates support fat loss, how to choose the right model for your space and goals, how to set up safely, and how to build a progressive weekly routine that keeps delivering results.
You'll also learn how to pair your plate sessions with simple nutrition habits, track your progress in a way that actually motivates you, and avoid the most common mistakes that hold beginners back.
Throughout this guide, we'll reference Bluefin Fitness vibration plates, including the Ultra SLIM and 4D Triple Motor models. Both are designed specifically for home use, built with UK-designed silent-drive motor technology, and ideal for the kind of structured, progressive approach we're about to walk through together.
Ready to stop wondering and start doing? Let's get into it.

Step 1: Understand How Vibration Plates Support Weight Loss
Before you step on the plate and hit start, it's worth spending a few minutes understanding what's actually happening inside your body during a session. This isn't just interesting science — it genuinely changes how you train.
The core mechanism is something called whole-body vibration, or WBV. When the plate vibrates, your body has to stabilise itself constantly against that rapid movement. To do that, your muscles contract involuntarily, often many times per second. Your nervous system is working overtime to keep you balanced and upright, even when you're just standing still. That's why vibration plate sessions can leave your legs feeling genuinely worked, even during what looks like passive standing from the outside.
This increased muscle activation means your body is burning more energy than it would during the same period of standing on solid ground. When you layer active exercises on top, like squat holds or glute bridges, you amplify that effect significantly. Large muscle groups working under vibration demand more from your cardiovascular system and your metabolism.
It's important to be clear about expectations here. Vibration plates complement diet and cardio; they don't replace them. Think of the plate as a tool that makes your existing efforts more effective, not a shortcut that bypasses them. The most successful users treat their plate sessions as one part of a wider routine that includes movement, good nutrition, and adequate rest.
Two settings you'll hear about constantly are frequency and amplitude. Frequency, measured in hertz (Hz), refers to how many vibration cycles happen per second. Amplitude refers to the depth or range of that movement. Higher frequencies engage more muscle fibres and are better suited to intermediate and advanced users. Lower frequencies are gentler and ideal when you're starting out or recovering. Wider amplitude means more muscle recruitment per cycle. Understanding these two dials means you can train smarter from session one, rather than just guessing.
The low-impact nature of vibration plate training is also worth highlighting. Unlike running or high-intensity interval training, vibration plates place minimal stress on the joints. This makes them genuinely accessible for beginners, people returning to exercise after a break, or anyone managing joint sensitivity who still wants to build strength and support fat loss.
The mindset shift here is simple but powerful: you're not just standing on a plate. You're actively engaging your muscular and metabolic systems in a way that compounds over time. That understanding is what drives consistency, and consistency is what drives results.
Step 2: Choose the Right Vibration Plate for Your Goals
Not all vibration plates are built the same, and choosing the right one for your space, fitness level, and goals makes a real difference to your long-term results. Here's what actually matters when you're comparing models.
Motor type: The most common entry-level plates use oscillating motors, which create a seesaw-style movement from side to side. These are effective, beginner-friendly, and a great starting point for most people. More advanced plates, like Bluefin's 4D Triple Motor models, use multiple motors working in different planes simultaneously, generating vertical, horizontal, and lateral vibration. This multi-directional stimulus recruits more muscle fibres and allows for a more varied, progressive training experience over time.
Frequency range: Look for a plate that covers at least 15 to 50 Hz. This gives you room to start gently and progress as your fitness improves. A plate with a narrow frequency range will limit your ability to advance your training without buying a new model.
Amplitude: Wider amplitude means more intense vibration and greater muscle recruitment. If your goal is weight loss and you want to push your sessions as you get fitter, a plate with adjustable amplitude gives you more control over intensity.
Platform size: Bigger isn't always better, but you do need enough surface area to perform exercises like wide-stance squats and lunges comfortably. Check the dimensions before you buy, especially if you're taller or have wider hips.
Noise level: This is a big one for home use, particularly if you live in a flat or have neighbours below. Bluefin Fitness plates are built with UK-designed silent-drive motors, which is a genuine differentiator. A quieter plate means you can train at 7am without worrying about the people downstairs.
In terms of specific models, the Bluefin Ultra SLIM is an excellent choice if space is a priority. It's sleek, easy to store, and powerful enough for a comprehensive weight loss programme. If you're looking for a more progressive, high-performance experience, the 4D Triple Motor plate delivers multi-directional vibration that keeps sessions challenging as your fitness develops.
If you're not sure which model suits you best, Bluefin's 'Which Plate' quiz on the website is a genuinely useful starting point. Answer a few questions about your space, goals, and fitness level, and it points you toward the right option without any guesswork.
The right plate is the one you'll actually use. Prioritise the features that match your real life: your home setup, your training history, and where you want to be in three months. Get that choice right, and everything else in this guide becomes much easier to follow through on.
Step 3: Set Up Your Plate and Learn the Foundational Stance
Getting your setup right before your first session isn't just about safety; it's about making sure every session after this one is as effective as possible. A few minutes of preparation here saves weeks of correcting bad habits later.
Placement: Position your plate on a flat, hard surface. Carpet can work for some models, but a solid floor gives you the most stable and effective vibration transfer. Leave at least a metre of clear space around the plate in every direction so you can extend your arms, step off safely, and move through exercises without bumping into furniture. Keep it away from walls for the same reason.
The foundational stance: This is the position you'll return to between exercises and during passive vibration recovery periods. Stand with your feet roughly shoulder-width apart, toes pointing slightly outward. Bend your knees gently — think of it as a soft, comfortable micro-squat rather than a full bend. Never lock your knees straight. Engage your core lightly, as if you're bracing for a gentle tap to the stomach. Keep your shoulders relaxed and your chest open. Your weight should feel evenly distributed across both feet.
This stance is your foundation for everything. Get it right and the vibration travels through your muscles the way it's supposed to. Get it wrong, specifically by standing with locked, straight legs, and the vibration bypasses the muscles entirely and goes straight into your joints. That's both ineffective and uncomfortable.
Starting frequency settings: For your first two weeks, keep the frequency between 25 and 30 Hz. This range is enough to produce real muscle activation without overwhelming a body that isn't yet adapted to vibration training. Resist the urge to crank it up to maximum on day one. Your body needs time to adapt, and starting too high can cause excessive soreness or dizziness, which puts people off continuing.
Using resistance bands: Many Bluefin plates come with resistance bands included. Use them from your very first session. Even simple movements like bicep curls or shoulder raises while standing on the plate bring your upper body into the session, increasing overall muscle engagement and calorie demand. It's one of the easiest ways to get more from every minute you spend on the plate.
Before you begin any session, check your specific model's instruction manual for setup guidance. Bluefin's product pages include model-specific instructions, and the team is available if you have questions about your particular plate.
Once you can stand on your plate in the correct stance, at the right frequency, feeling stable and comfortable, you're ready to start your first proper programme.
Step 4: Follow a Beginner Weight Loss Workout Plan
Here's where the work actually begins. The goal for your first two weeks is simple: build the habit, learn the movements, and let your body adapt. Don't overthink it. Short, consistent sessions beat long, sporadic ones every time, especially in the early weeks when the priority is forming a routine you'll stick to.
Week 1 and 2 plan: Aim for three to four sessions per week, each lasting 10 to 15 minutes. That's it. This might feel underwhelming, but it's exactly right for this stage. Your muscles, joints, and nervous system are all adapting to a new stimulus. Respect that process and you'll progress faster in weeks three to six than if you push too hard now and burn out.
Before every session, spend two to three minutes warming up off the plate. Walk on the spot, do some gentle leg swings, roll your shoulders, and loosen your hips with slow circles. Skipping this is the most common beginner mistake, and it's an easy one to avoid.
Here are five foundational exercises to build your sessions around:
1. Basic stance (passive vibration): Stand in your foundational position at 25–30 Hz for 60 seconds. Use this as your starting position and your recovery position between exercises. It's more effective than it looks.
2. Squat hold: Lower into a squat position, thighs roughly parallel to the floor, and hold for 30 to 45 seconds. The vibration intensifies the demand on your quads, glutes, and core significantly. Rest for 30 seconds in the basic stance, then repeat.
3. Calf raises: Rise up onto your toes slowly, hold for a beat, then lower back down. Do this continuously for 45 to 60 seconds. Excellent for circulation and lower leg engagement.
4. Plank with hands on plate: Place your hands on the plate surface and hold a plank position, body straight from head to heels. The vibration travels through your arms and into your core. Hold for 20 to 30 seconds to start, building up as you get stronger.
5. Glute bridge: Sit on the floor in front of the plate, place your heels on the platform, and drive your hips upward into a bridge position. Hold for 30 to 45 seconds. Outstanding for glutes and hamstrings.
Rotate through these exercises with 30 seconds of rest between each one. Keep the frequency at 25 to 30 Hz throughout. By the end of your first full session, you should feel your legs, glutes, and core have been genuinely engaged. That's your success indicator: real muscle sensation, not exhaustion.
Step 5: Progress Your Training as You Get Stronger
Weeks three to six are where the real transformation begins. Your body has adapted to the baseline stimulus, your technique is more confident, and now it's time to push the envelope. This is the stage where many people start noticing visible changes in muscle tone and overall energy levels.
Updated session structure: Extend your sessions to 20 to 25 minutes. Increase your frequency gradually into the 30 to 40 Hz range, adjusting based on how your body responds. You should feel challenged but in control. If you feel dizzy or uncomfortable at a new setting, drop back down and progress more gradually.
Add these intermediate exercises to your rotation:
Alternating reverse lunges: Step one foot back off the plate into a lunge, keeping the front foot on the platform. Alternate legs for 30 to 45 seconds. The instability created by the vibration under your front foot makes this significantly more demanding than a standard lunge.
Press-up position holds: Similar to the plank, but with slightly bent elbows and more weight shifted forward over your hands. Hold for 20 to 40 seconds. Builds shoulder stability and core strength simultaneously.
Side-to-side weight shifts: In your basic stance, slowly shift your weight from one foot to the other in a controlled rhythm. This engages the stabiliser muscles along the outer hips and inner thighs that static exercises often miss.
Resistance band rows: Stand on the plate, loop the resistance bands under your feet, and perform rowing movements, pulling the bands toward your hips. This brings your back muscles, biceps, and rear shoulders into the session.
The principle driving all of this is progressive overload. Your body is remarkably good at adapting to a repeated stimulus, which is why using the same settings and the same exercises every session will eventually stop producing results. Increase something regularly: the frequency setting, the session length, the exercise complexity, or the resistance band tension. Even small increases compound meaningfully over weeks.
On the days you're not using the plate, consider adding light cardio, a 30-minute walk, a gentle cycle, or a swim. This keeps your metabolism active and your fat-burning systems engaged without adding significant recovery demand. The combination of plate sessions and low-intensity cardio on alternate days is one of the most effective structures for sustained fat loss.
Your success indicator at this stage: reduced fatigue during sessions compared to week one, improved confidence with more complex movements, and the beginning of visible changes in muscle tone and body shape.

Step 6: Pair Your Plate Routine With Nutrition for Real Results
Here's the truth that no fitness brand should shy away from: no exercise tool, including a vibration plate, can outwork a consistently poor diet. Training and nutrition are partners. Get both working in the same direction and your results accelerate. Neglect one and the other struggles to compensate.
You don't need a rigid meal plan or calorie counting app to make progress. A few practical, sustainable habits will do most of the heavy lifting.
Prioritise protein: When you're in a calorie deficit, which is usually necessary for fat loss, your body can break down muscle tissue for energy. Eating enough protein helps preserve that muscle while your body burns fat instead. Practical sources include eggs, chicken, fish, Greek yoghurt, legumes, and protein shakes if you prefer convenience. Aim to include a protein source at every meal.
Reduce ultra-processed foods: These tend to be calorie-dense, low in nutrients, and easy to overconsume without feeling full. You don't need to eliminate them entirely, but reducing how often they appear in your day creates a natural calorie reduction without the mental effort of counting every gram.
Stay well hydrated: Vibration training is thought to stimulate the lymphatic system, which plays a role in clearing waste products and reducing water retention. Staying well hydrated supports this process and can contribute to the feeling of reduced bloating that many users notice in the early weeks of consistent plate training.
Timing around sessions: Avoid heavy meals in the 60 to 90 minutes before a vibration plate session. The combination of a full stomach and vibration can cause genuine discomfort. A light snack is fine; a large meal is not. After your session, it's a good time to eat protein-rich food to support muscle recovery.
The early weeks of vibration plate training can sometimes produce a noticeable shift on the scales that reflects reduced water retention rather than fat loss. This is normal and encouraging. It means your body is responding. True fat loss follows with consistency over weeks, not days.
Your success indicator here is simple: you've identified one or two realistic nutrition adjustments that complement your plate training, and you understand how your eating habits interact with your results.
Step 7: Track Progress and Stay Consistent Over Time
The final step is the one most people skip, and it's often why motivation fades after the first few weeks. Tracking your progress properly keeps you honest, keeps you motivated, and helps you make smarter decisions about when to push harder and when to recover.
Start by stepping away from the scales as your primary measure of success. Here's why: vibration plate training builds muscle while supporting fat loss. Muscle is denser than fat, which means your body composition can be improving significantly while the number on the scales barely moves, or even goes up slightly. If the scales are your only data point, you might conclude that nothing is working when the opposite is true.
Use these tracking methods instead:
Weekly photos: Take a front, side, and back photo at the same time each week, in the same lighting. Changes that are invisible day to day become obvious when you compare week one to week eight.
Body measurements: Measure your waist, hips, and thighs once a week. These numbers tend to reflect body composition changes more accurately than weight alone.
Energy levels and sleep quality: Regular exercise, including vibration plate training, typically improves sleep and daily energy over time. Noticing these changes reinforces that your routine is working, even before the mirror catches up.
How your clothes fit: This is one of the most honest and motivating indicators of all. A pair of jeans that felt tight in week one becoming comfortable by week six tells you everything you need to know.
Keep a simple weekly log: the date, session duration, frequency settings used, and one brief subjective note. Something like "felt strong today" or "legs were tired but pushed through" gives you a record of your mental and physical progress that numbers alone can't capture.
The hardest stretch is weeks three and four. The initial novelty has worn off, visible results may not yet be dramatic, and life will inevitably get in the way of a session or two. This is normal. Consistency matters more than perfection. Missing one session doesn't break your progress. Missing three weeks does.
If you have questions about your specific Bluefin model or want guidance on settings and results, the Bluefin FAQs page and customer support team are genuinely useful resources. You're not doing this alone.
Set yourself a realistic eight-week goal. Not a vague aspiration, but a specific, measurable target: completing 24 sessions, losing a set number of centimetres from your waist, or being able to hold a 60-second squat on the plate at 40 Hz. Concrete goals create concrete motivation.

Your Vibration Plate Weight Loss Checklist
You now have everything you need to start and sustain a vibration plate weight loss programme that actually works. Before you step on the plate, run through this checklist to make sure you've covered every base.
Step 1 complete: You understand how whole-body vibration drives muscle activation and supports fat loss, and you have realistic expectations about what the plate can and can't do on its own.
Step 2 complete: You've identified the right plate for your space, budget, and goals. If you're still deciding, the Bluefin 'Which Plate' quiz is the fastest route to clarity. The Ultra SLIM suits space-conscious home users; the 4D Triple Motor is built for those who want progressive, high-performance training.
Step 3 complete: Your plate is positioned safely, you know the foundational stance, and you're starting at 25 to 30 Hz rather than jumping straight to maximum.
Step 4 complete: You have a structured Week 1 to 2 plan: three to four sessions per week, 10 to 15 minutes each, built around five foundational exercises.
Step 5 complete: You know how to progress your training in weeks three to six with longer sessions, higher frequencies, and more dynamic movements.
Step 6 complete: You've paired your plate routine with practical nutrition habits: more protein, less ultra-processed food, good hydration, and smart meal timing.
Step 7 complete: You have a tracking system in place and an eight-week goal to work toward.
Results come from consistency, smart progression, and treating your plate as part of a wider healthy lifestyle. Stick with it for eight weeks and the evidence will be in your measurements, your photos, and how you feel every morning.
Ready to get started? Explore the Bluefin Fitness range, take the 'Which Plate' quiz, or dive straight into the 4D Triple Motor and Ultra SLIM product pages. Learn more about our services and find the plate that's built for your goals.
Share:
7 Proven Strategies for Using a Vibration Plate for Recovery
7 Strategies to Find the Best Vibration Plate for Your Goals